|
|
|
|
|||||||||||||||||||||||||||||||||||||||||||||||||||||||||||||||||||||||||||||||||||||||||||||||||||
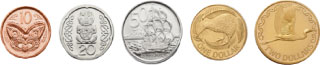
New coins
|
|
|
|
||
Colour |
silver |
silver |
copper |
||
Size (diameter) |
24.75mm |
21.75mm |
20.50mm |
||
Weight |
5.00g |
4.00g |
3.30g |
||
|
|||||
Existing coins
|
|
|
|
|
|
Colour |
silver |
silver |
silver |
silver |
|
Size (diameter) |
31.75mm |
28.58mm |
23.62mm |
19.43mm |
|
Weight |
13.61g |
11.31g |
5.66g |
2.83g |
|
|
|||||
Existing coins
|
|
|
|||
Colour |
bronze |
bronze |
|||
Size (diameter) |
23.0mm |
26.5mm |
|||
Weight |
8.0gm |
10.0gm |
|||
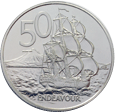
50 cents
|
Design: The bark Endeavour, commanded by Captain Cook, sailing south, with Mt. Taranaki (Egmont) in the distance |
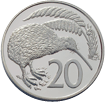
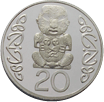
20 cents
|
Before December 1990 Design: A kiwi facing right and fern bush.
1991 onwards Design: A representation of a well-known Maori pukaki carving. |
10 cents
|
Design: A Maori carved head or koruru with Maori rafter patterns. |
5 cents
|
Design: A tuatara sitting on a coastal rock. A gull flies in the background. |
$1.00
|
Design: A kiwi with fern leaves. |
$2.00
|
Design: A kotuku (white heron), flying right. |
There are two designs for the 20 cent coin because New Zealand developed two new coins - the $1 coin and $2 coin - in 1990. It was decided to feature the kiwi on the $1 coins (so we truly have a kiwi dollar), so the kiwi was removed from the 20 cent coin.
In 2006 we do not need any new pictures for our coins as we are just changing their size and composition.
Have the students feel the new 20 cent coin. Explain that it has been made with notches (indentations or marks you can feel) on its side or rim so that blind and visually impaired people can recognise it easily by feel.
Do some activities with students, such as having them point to the correct coin as you name it, so they become familiar with the new coins.
Have the students make a rubbing of the new coins by placing a plastic coin under a piece of paper and holding it there while they use their pencil (held on a slant) to draw over the coin.
You could tell students that our 50 cent piece was one of the biggest coins in the world. Australia and Tonga also have a large coin. People found the large coins a nuisance. They were too heavy and too big to carry around in pockets or wallets so the Reserve Bank, which makes and issues New Zealand notes and coins, decided to make all the coins smaller.
Explain that everybody in New Zealand will need to get used to using the new coins. Some people work in jobs where they are handling money and coins and will have to get used to the new coins very quickly. Have the students identify jobs they know of where people handle money (like shop assistants, bus drivers and bank tellers).
Give a student a coin and ask if they think the coin could be older than they are. Tell them that some coins could be almost 40 years old. Ask them how we find out how old a coin is. Have the students find some coins that are older and some coins that are younger than they are.
Ask the students if they have seen coins from another country. You or a student may be able to bring in some coins from other countries. Explain that you cannot buy things with these coins in New Zealand. You can use New Zealand money (notes and coins) only in New Zealand and two Pacific Islands, Niue and the Cook Islands. New Zealand money will not buy goods in Australia, or Samoa, or any other country the students can name.
Discuss with the students the process of making a coin using the photo story in the making coins section.
Discuss going into a shop and finding out how much something costs, then paying for it with cash and being given some change. You could also discuss other ways adults can pay for goods if students mention EFTPOS, credit cards or cheques.
Set up a shop corner in the classroom and have students role play buying and selling using the plastic new coins.
Ask the students:
who gives them coins or other money
what they do with the coins/money they are given (spend, save, or save until they have enough money to buy something they really want then buy it )
what shops they spend coins in
what shops they spend larger amounts of money in
what they buy with their coins/saved money
to name some special occasions when people give them coins or money like birthdays, festivals, the tooth fairy etc.
Ask the students:
where they put money they want to save
do they have a ‘piggy bank’ or a money box
to draw and describe the container they store coins in and have the students work out what all the containers have in common (a way to get the coins in and out, space for lots of coins)
what they do when they have a lot of coins in their container.
Explain to the students that they will have to take all the coins they have stored out of their money box, or other storage container, and go with their parents or caregivers to a bank to bank them or swop them for notes and new coins. After 1 November 2006 they will not be able to buy things with the old coins.
Your class could make money boxes out of paper mache or by covering an interesting shaped box with art work, then varnishing it and cutting a slit for the money to go in. Students could work out how big the slit needs to be and why. They would need to break the box open to get their money out.
Ask the students
if they have ever found a coin
where they have found coins
Explain that most houses have ‘lost’ coins. These could be coins that have fallen somewhere out of sight, or be coins that been put somewhere and then been forgotten about. If families want to use these coins they need to find them before 1 November 2006. The students could go home and talk to their families about gathering up all the lost or mislaid coins and using them to buy or do something special. Ask the students where would be a good place to look for coins but remind them to ask Mum or Dad or a caregiver before they go looking for lost coins.

Discuss what might happen to one 50 cent coin after the bank has given it to a shop and then it was given to a student as change. You could build an illustrated class story, or act out some dramas about the life of the coin. Don’t forget to have it lost for a while and then found by a lucky person.
Have the students complete an artwork to take home about the new coins so they can talk about them to their family.
![]()
![]()
Hosted by:
![]()
![]()